One of the key features of Microworkers is you can create and customize a Qualification test for potential workers. This test can help you, the Employer, find the most qualified, skilled and right workers for your specific needs. In this article, we will guide you through the process of creating an effective Qualification test.
Let’s take an “Audio Transcription” task as our example project. You have lots of audio clips needing to be transcribed.
➥ First, create or choose a template for your campaign
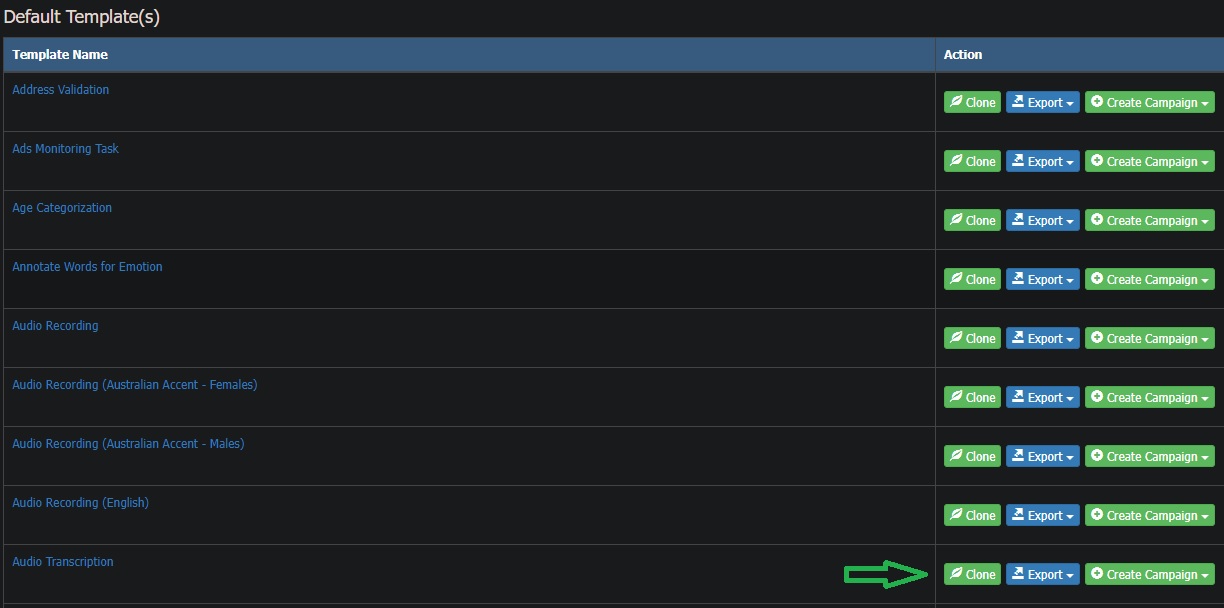
One good thing about Microworkers is you don’t have to start from zero. We have lots of ready-to-use templates you can use for your Qualification test campaign. All you have to do is edit one to match your requirements. Simply go to “My Templates” page and click the “Clone” green button of your chosen default template then edit if needed.
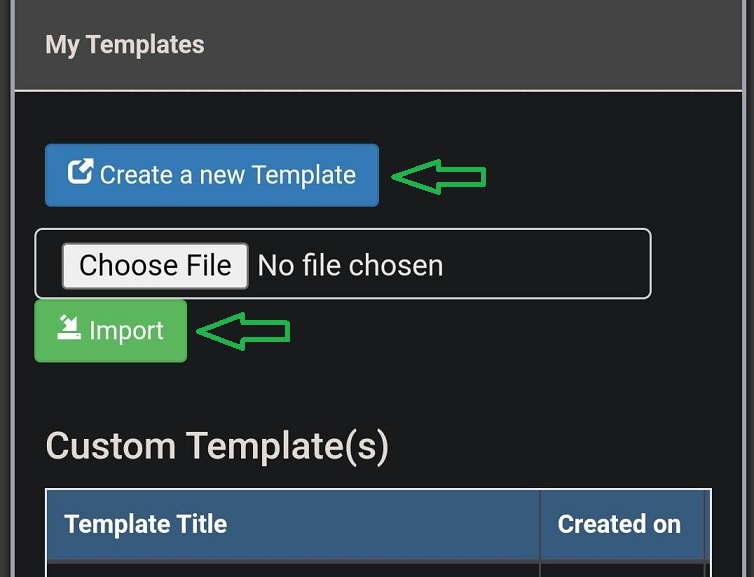
On the other hand, if you prefer to create your own template, utilize the “Create a New Template” button then start making your template. Or, if you have a ready template, you may upload it in our website by clicking the “Choose file” button then import.
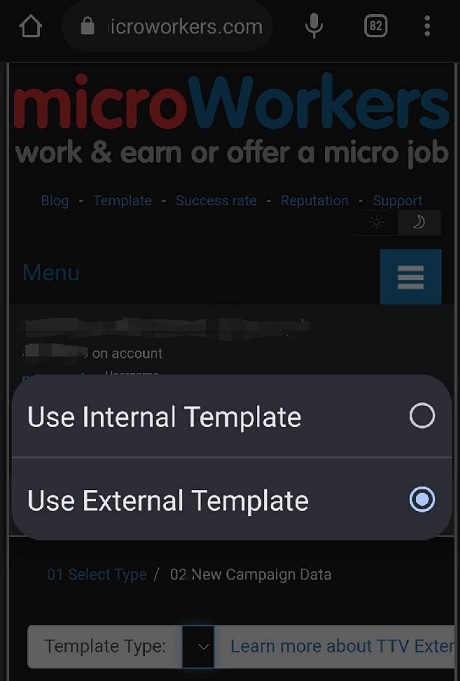
 Also, you have the option to use an External template, if preferred. Go to the “Create TTV Campaign“ page and tick the radio button for “Use External Template”.
➥ Second, write clear and concise instructions
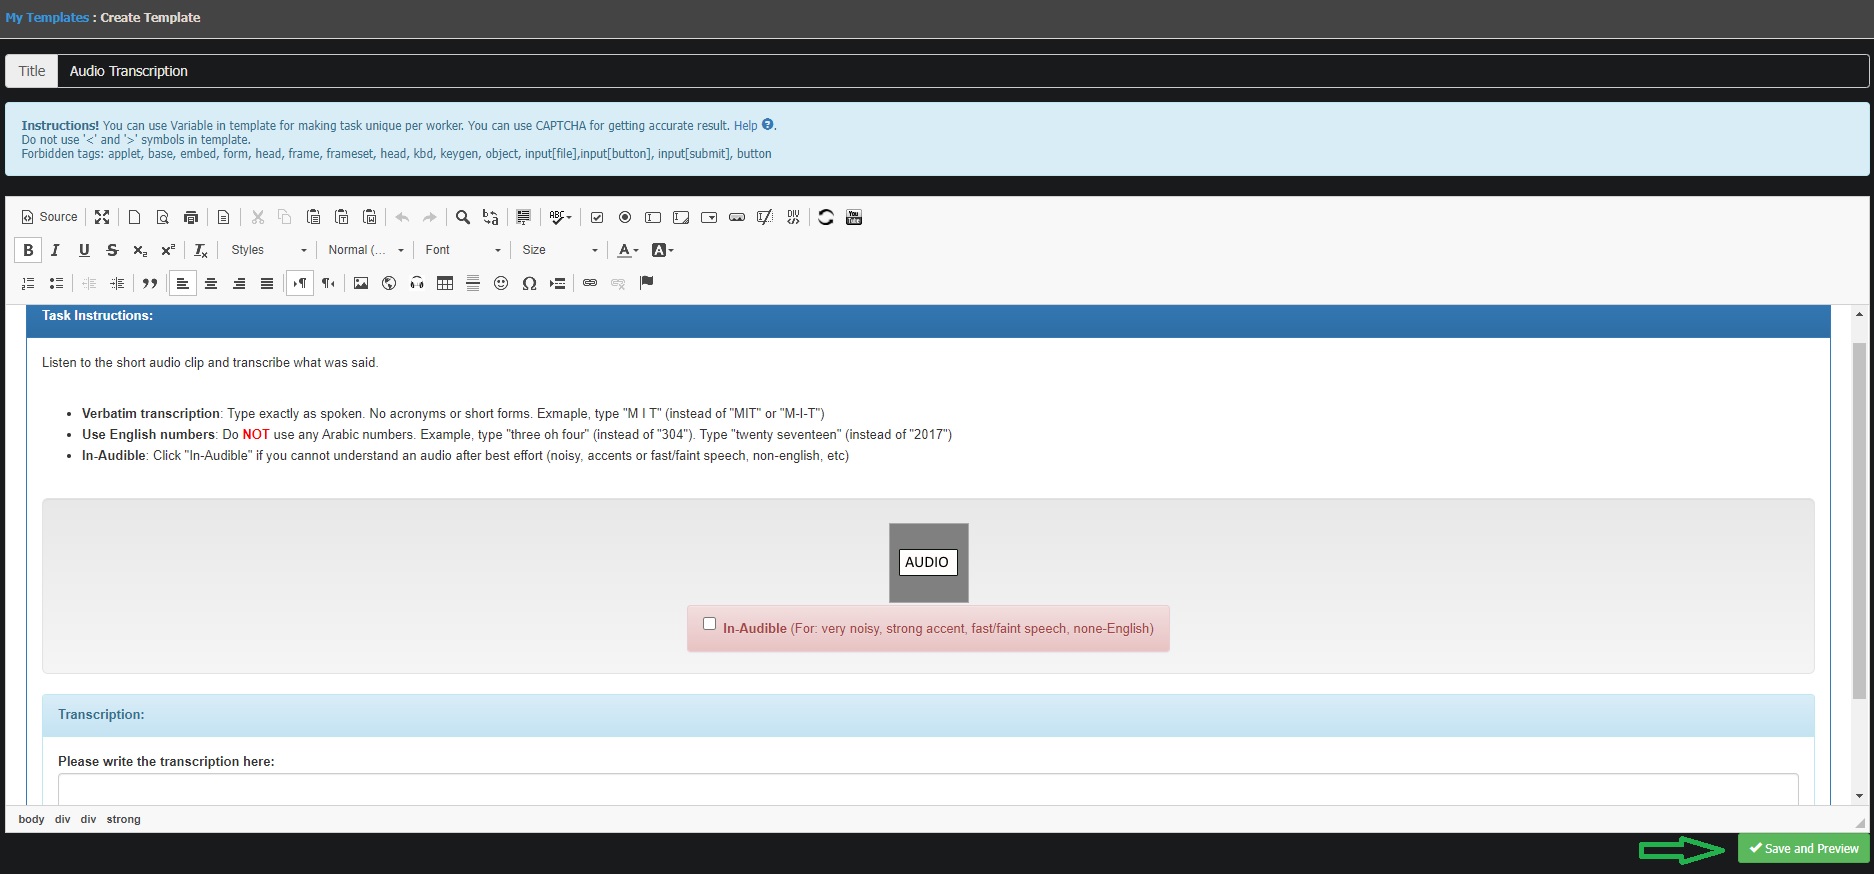
Write down the instructions in your template. When creating the instructions for your qualification test, keep them clear, concise, and relevant. Avoid ambiguity or overly complex phrasing, as it may confuse workers and lead to inaccurate results. Ensure that your instruction assesses a specific skill or knowledge area related to the task. Once done, click the “Save and Preview” button at the bottom of the page.
If you want each worker to transcribe different audios, a CSV file is needed. Upload your CSV file in the “Variable(s)” section found at the bottom of your created template. Sample CSV file can also be downloaded at the bottom.
A video tutorial guide on how to edit a default template can be seen here.
😉 If you feel you need help in creating your template, do not worry! Just send us a message and we are willing to create one for you!
➥ Third, enter the campaign details and specify your task requirements
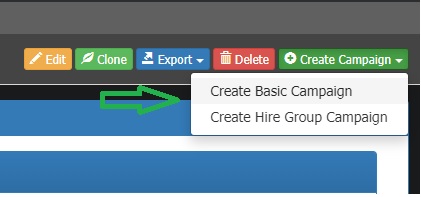
Now you are ready to create and enter the necessary details of your Qualification test campaign. Click “Create Campaign” green button found at the upper right side of the template created. Next, choose from the dropdown selection if you wish to submit your campaign under Basic or Hire Group section. Afterwards, you will be redirected to the new campaign data page.
🤔 Let us try to understand more the “New Campaign Data” page where you will be entering all the data needed.
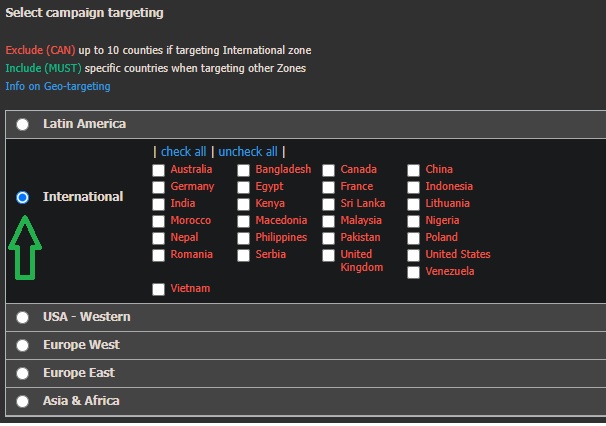
- As the first step, you must select the countries in which to launch your campaign. Countries/zones are displayed for you. Supposing you want to run your campaign under Basic section using the International zone as you are open to all countries as long as they are good at transcription. Mark the button for International zone and do not tick any box since you want to include all countries.
📝 One important thing to know about International zone is when you tick a box for a certain country, this would mean that you are EXCLUDING it. Unlike for other zones, ticking a box would mean an INCLUSION on your targeted zone. Choosing just one country may be applied for other zones except International zone.
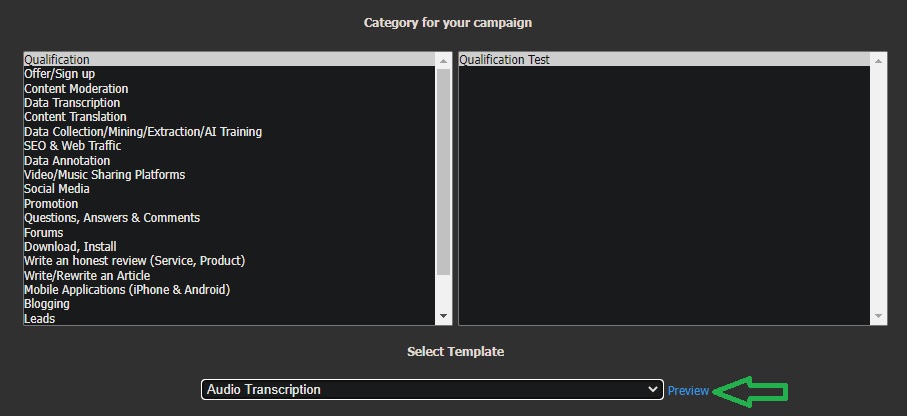
- Next is to choose the category for your campaign. Since you will be running a Qualification test, you need to select the “Qualification” category.
📝 Unlike other tasks/categories, Qualification test campaign does not cost anything. However, under Basic section, there is an approval fee to be charged.
- Then under “Select Template” field, pick your created template. Template created may be seen and checked by clicking the “Preview” function.
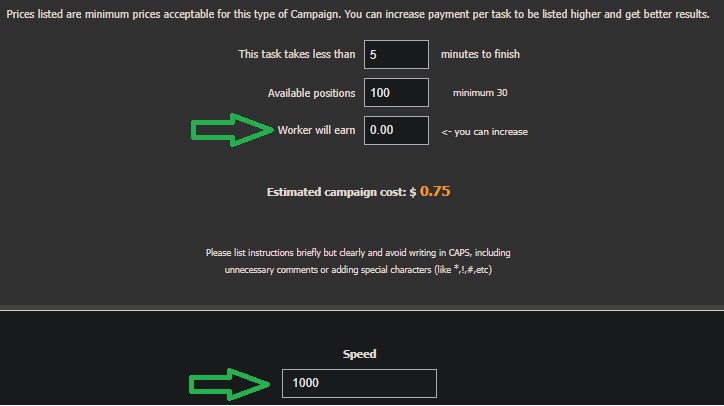
- After that, under “This task takes less than __ minutes to finish” or what we call TTF (Time to Finish), input a time limit for your Qualification test. By setting a reasonable time limit, it ensures that the test is completed efficiently. Consider the complexity of the task involved and provide ample time for workers to think through their answers. This will allow workers to showcase their abilities and skills without feeling rushed.
- Subsequently, input the number of positions desired in the “Available positions” field. Minimum number of positions under Basic section is 30.
- Now under “Worker will earn” field, since Qualification test costs nothing, you have the option to enter any desired amount you wish to pay the workers.
- Following is the “Speed” function. Setting your speed to the maximum, which is 1000, will help you get your job completed quickly if it is what you require.
📝 Know more about the “Speed” feature in this article.
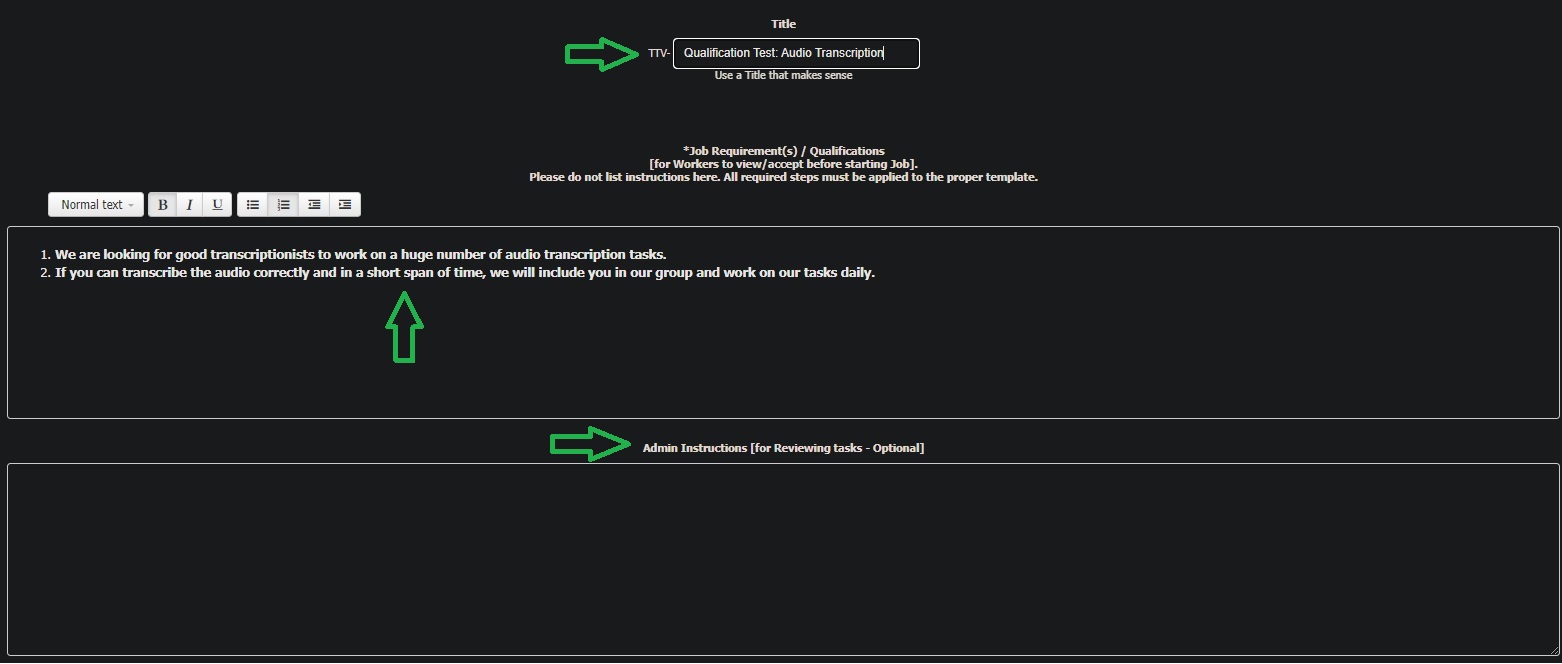
- On the “Title” box, write a title that makes sense. Keep your title brief and clearly state the nature of the Qualification test. A long title may be overwhelming or confusing. Aim for clarity and simplicity. Include relevant keywords that describe the required skills or knowledge. For example, because we are testing audio transcription skills, you can write “Qualification Test: Audio Transcription”
- Let us move on to the next field which is the “Job Requirement(s) / Qualifications”. Here is where you define the task requirement. Think of what certain skills and knowledge do you need from workers to complete your audio transcription task. Since the task is to transcribe the audio clip, describe your requirements clearly and briefly. This will serve as the foundation for your test creation process.
📝 Do not list the required steps/instructions here. Remember that all steps are already listed in your template.
Sample requirements are as follows:
1. We are looking for good transcriptionists to work on a huge number of audio transcription tasks.
2. If you can transcribe the audio correctly and in a short span of time, we will include you in our group and work on our tasks daily.
- For “Admin Instructions” box, you can list any important information which you want to notify/bring to an Admin’s attention in connection to task’s review/rating. (Example: “Please decline all task submission that spent less than 2 minutes working on task” OR “Please decline all tasks which did not pass captcha” etc). Admin Instruction is optional. It should be used when Rating preferences are “Admin Rate” OR “Admin Review & Employer Rate”. If you decide to rate the tasks by yourself, you can leave this box/field blank. And since Audio transcription task should be checked from your end, we leave this box empty.
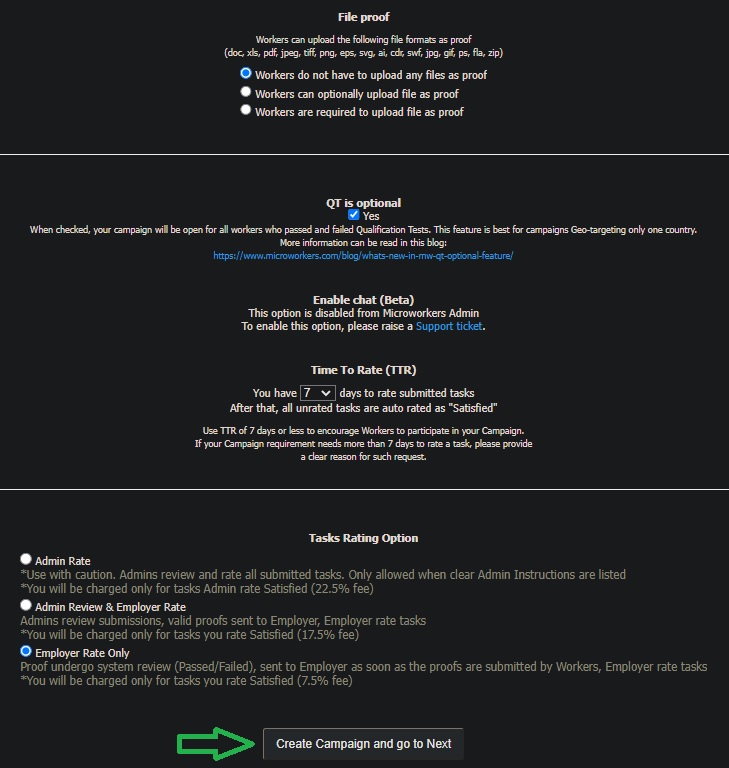
- “File Proof” field is next. Although we will not require a file proof, let us still explain this function. In Microworkers, workers can upload a file in a form of screenshot or doc file as proofs. Only supported file format are accepted by the system. Some campaigns may require screenshots as proof of task completion. Hence this feature is also essential.
- Added feature is the “QT is optional” field. “QT Optional” feature can help populate your campaign timely. How? When selected, by ticking the “Yes” box, your campaign will be open for all workers who passed and failed the Microworkers’ hosted Qualification Tests (Admission and English Proficiency test). It is best for campaigns Geo-targeting only one country.
📝 More information about “QT Optional” feature can be read in this blog.
- Aside from “QT is optional”, we also have the “Enable chat (Beta)” feature. For the purpose of communicating to workers with regards to their task/s, you can request to enable this feature by sending a support ticket.
📝 To know more about “Chat” feature, please visit this article.
- “TTR” or “Time to Rate” is another important detail to consider. This is the number of days allotted for you to rate all the proofs submitted by the workers. By default, it is set to 7 days. One way to encourage workers to perform your task is to have a “TTR” of 7 days or less.
📝 Ensure that you will rate all the tasks on or before the set “TTR”. Otherwise, the system will automatically rate the tasks as “Satisfied”.
- Last detail is the “Tasks Rating Option”. We know that rating tasks can be difficult especially for campaigns that have lots of positions. But with TTV’s Tasks Rating, you have the option to choose from the following:
⇒ Admin Rate
Admins do the review and rating of all submitted proofs. This option can only be allowed when you have listed a clear instruction in the “Admin Instructions” box.
⇒ Admin Review & Employer Rate
Selecting this task rate option allows Employers to rate submitted proofs. But before the proofs land on the Employer’s campaign page, they will undergo admin review first and only valid proofs will be sent to the Employer.
⇒ Employer Rate Only
Proof undergoes system review if passed/failed. Then it will be sent to the Employer as soon as the proofs are submitted by Workers. Employer rates the task.
- Finally, you are done entering all the needed details. Click “Create Campaign and go to Next” button found at the bottom of the page. It will redirect you to the next page. One more step is needed in order for your campaign to be submitted. And that is by simply clicking the button at the bottom to continue. Then click “Confirm” at the final page.
- Your campaign is now under pending review. Once launched, it will now be open to all workers in your targeted zone.
➥ Fourth, check and rate the tasks
Manually verify and rate the tasks. You also have the option to set “Complexity Level” and “Minimum Success Rate (%)” for tasks to be approved by the system. More information about “Complexity Level” and “Minimum Success Rate (%)” can be read here.
➥ Lastly, populate your group
Workers who have passed the Qualification test can now be included in your group. And voila! You are now assured you can direct your future Audio Transcription tasks to only qualified participants.
📝 Visit this article on how to populate your group from the Qualification test.
By following the step-by-step tutorial outlined above, you can design an effective qualification test that accurately evaluates workers’ abilities. 😉

No Comments so far.
Your Reply