Managing the availability and distribution of tasks can make a huge difference in productivity and overall success. We are excited to introduce the advanced “Maximum Position per Day” feature which is designed to offer flexibility and control over your campaigns. With three customizable options—Basic, Standard, and Advanced—you can tailor your task scheduling and worker management based on your specific needs. Whether you’re managing a small task queue or complex, time-sensitive projects, this feature adapts to your workflow. It will allow you to optimize how positions are filled daily. Below, we’ll explore how each option works.
But first off, let me give you a demonstration on how to use the feature first. Once your campaign is created, navigate to the ‘My TTV Campaigns’ page and access your campaign. Enable the feature by clicking the pen icon as shown in the photo:
Clicking it will redirect you to the ‘Manage maximum position per day’ page.
Now let’s explore how each option functions:
-
Basic Option: Simple and Straightforward
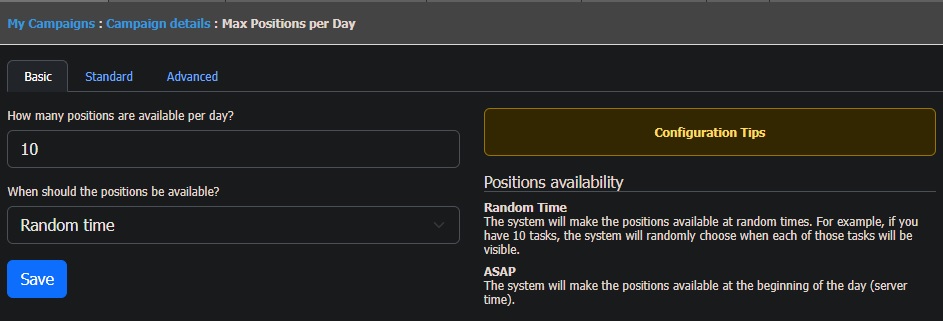
The Basic option is designed for quick, straightforward scheduling. Setting up daily task limits can be done with minimal configuration. This setting is perfect for users who need a simple solution to manage task availability.
Key Options in Basic:
- How Many Positions Are Available Per Day?
This option allows you to set the maximum number of positions (or tasks) that will be available on a given day. For example, if you have opened 100 positions and you wish to target a daily limit of 10 tasks, entering “10” will ensure that no more than 10 tasks are available in a single day. - When Should the Positions Be Available?
This gives you two options to control when tasks will be made available during the day:- Random: The system will distribute available positions at random intervals throughout the day. As an example, if you have 10 tasks, the system will randomly select when each of them will be visible to workers.
- ASAP: Target positions are made available at the beginning of the day (server time).
Example Configuration for Basic Option:
Scenario: Simple Daily Task Queue
Imagine you’re running a campaign where you opened 200 positions and needs to fill 20 positions per day. Then you want them available as soon as the day starts. You would configure it like this:
- Positions available per day: 20
- Availability: ASAP
Alternatively, if you’d prefer to spread these 20 positions across the day to slow down the speed of tasks done:
- Positions available per day: 20
- Availability: Random
With this setup, 20 tasks will be made available throughout the day at random times. This simple configuration ensures that the tasks are spread out evenly within the day.
-
Standard Option: Greater Control and Flexibility
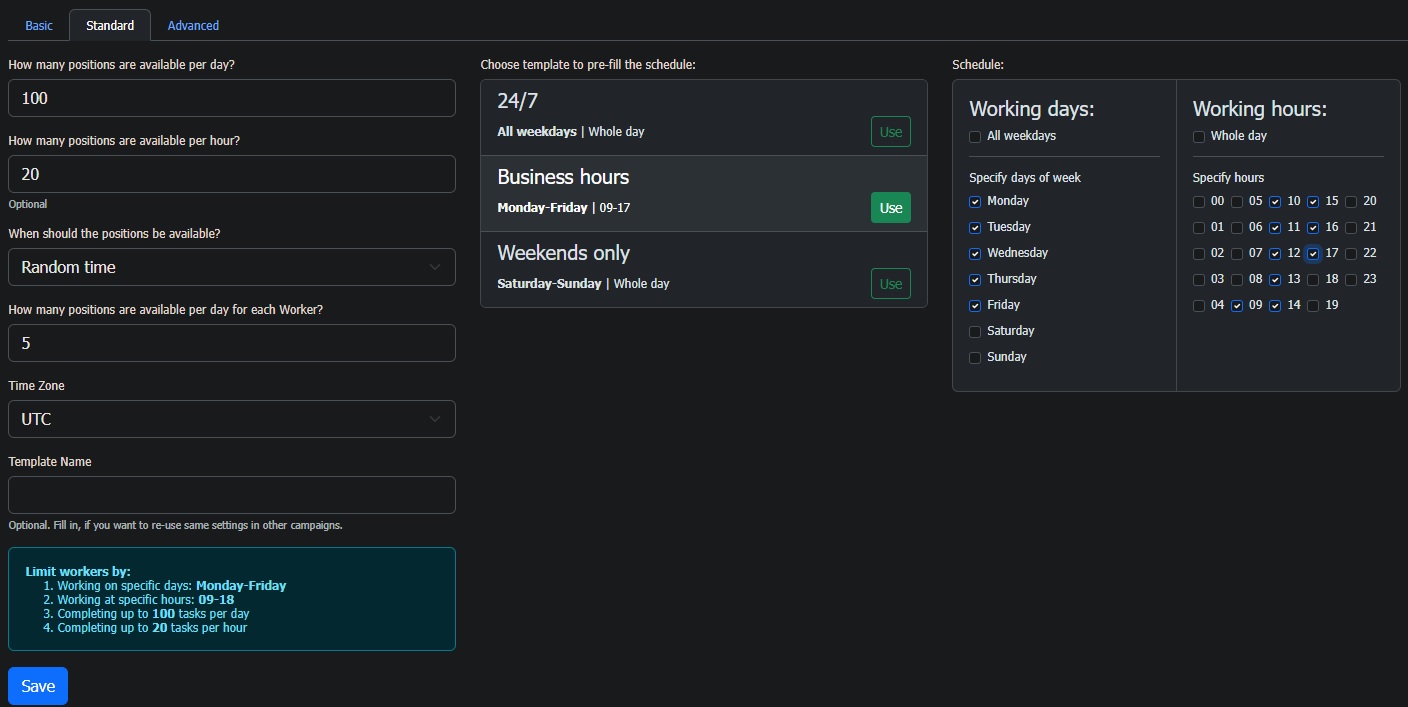
Standard option offers more control over task distribution by adding hourly limits, worker-specific limits, and time zone management. It also lets you choose a template to pre-fill the schedule, making it easier to manage recurring campaigns.
Added Key Options in Standard:
- How many positions are available per day for each worker:
Available in ‘TTV Hire Group’ section only. Set a cap on how many tasks a single worker can complete in a day. Example, you want to allow each worker to perform the task up to three times, entering “3” will permit each worker to do the task three times (3x). - Time Zone:
Select the appropriate time zone for your campaign to ensure tasks are released at the targeted right local times. - Template Name:
As an optional field, if you want to use the same options across multiple campaigns, save your configuration as a template by giving it a name.
Choose Template to Pre-fill the Schedule:
Template options you can choose from Standard option are as follows:
– 24/7 All weekdays/whole day:
Distributes tasks across all weekdays, for the whole day.
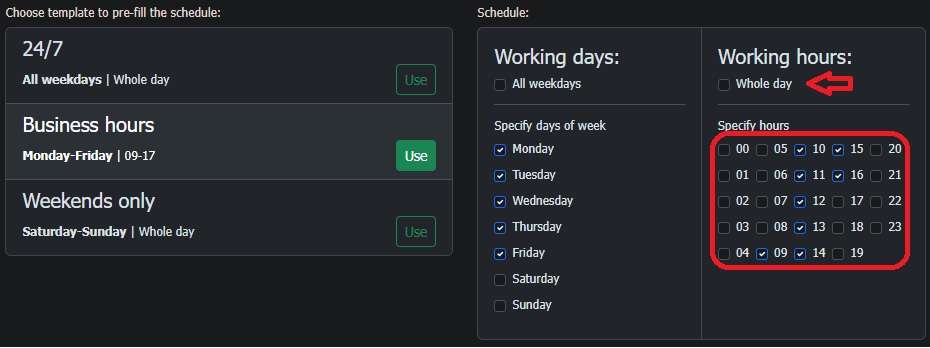
– Business hours:
By default, tasks are available from Monday to Friday, 9 AM to 5 PM (09:00-17:00). However, you have the option to add/select specified hours by ticking the box for hours. Choosing the ‘whole day’ configuration is also an option.
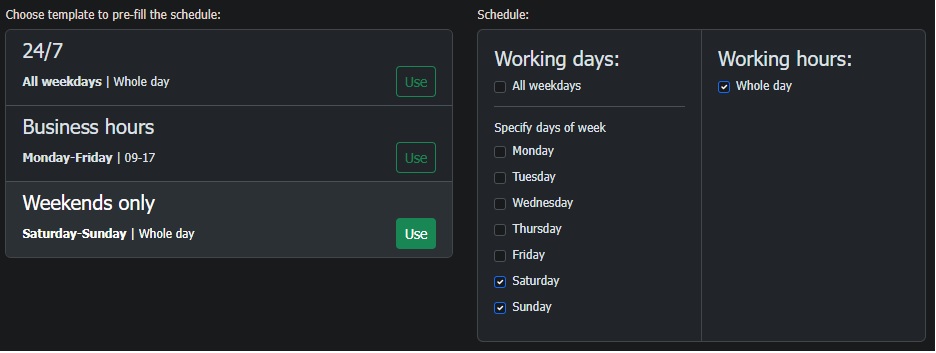
– Weekends only:
Limits task availability to Saturdays and Sundays, for the whole day. However, if you need to target specific hours, such can also be applied.
Example Configuration for Standard Option:
Scenario:
For a market research project, you need to gather data consistently throughout the week. Using the Standard option, you set 100 positions available per day, with 20 positions available per hour, from 9 AM to 5 PM, Monday to Friday. Each worker is limited to completing 5 tasks per day, ensuring a manageable workload. You can use the Business Hours template to pre-fill this schedule, optimizing setup time for future campaigns.
In this case, you would:
- Set 100 positions per day.
- Allow 20 positions per hour.
- Select Business Hours as the template for Monday-Friday, 9-5.
- Choose Random availability for a smoother distribution across the hours.
- Restrict workers to 5 positions per day.
- Time zone: UTC
- Click ‘Save’ to activate
This setup ensures that 100 positions are available daily, with no more than 20 tasks per hour, and each worker can only complete a maximum of 5 tasks each day. The tasks are distributed randomly throughout business hours, keeping the workflow steady.
-
Advance Option: Full Control and Customization
The Advanced option has a calendar function. You can add one-time or recurring events to the calendar, set precise hours of availability, and create worker limits that are highly customizable. Managing complex, long-term campaigns with detailed scheduling needs is made easy with this option.
Added Key Options to Fill:
- Add events to the calendar:
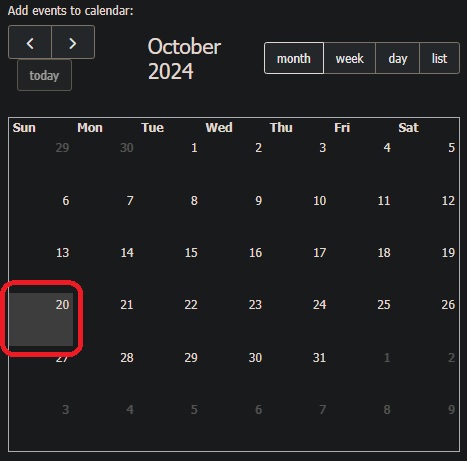
Tasks can be made available on specific dates and times, like every weekday or specific week days. Ensure to add at least one event to your calendar by clicking a date. Alternatively, you can drag your mouse to the dates you want to target.
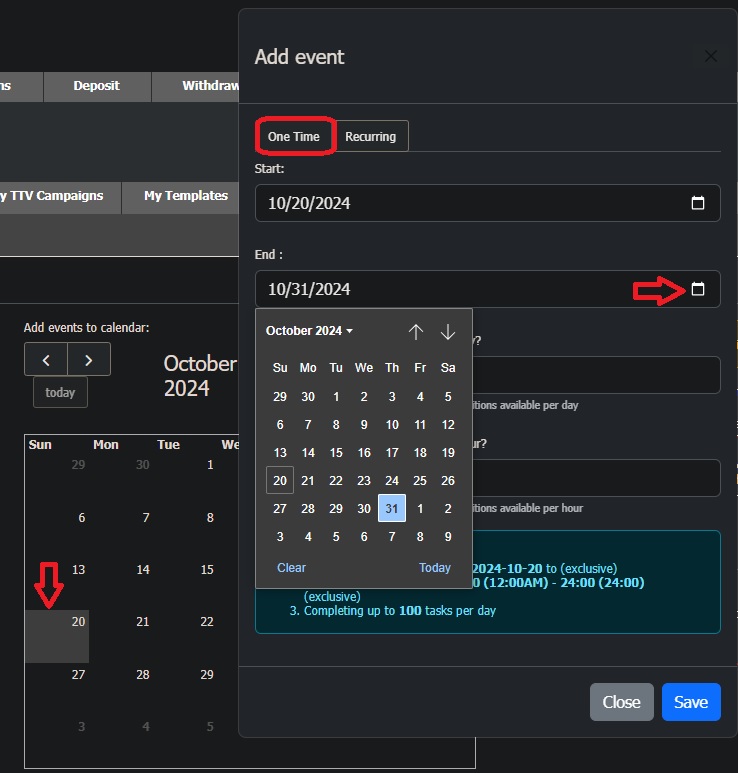
When an event has been selected, a pop-up box will be displayed. Set the desired dates manually or by using the calendar icon.
How to use the calendar:
Scenario 1 – Working on Specific Days (One-Time Events):
Suppose you are launching an annotation campaign for a product that is available for a limited time, from October 20 to October 31. During this period, you want tasks to be available only on those specific days to align with the product promotion timeline.
How to Configure:
Add a one-time event for the specific dates: October 20 to October 31 as seen in the image below:
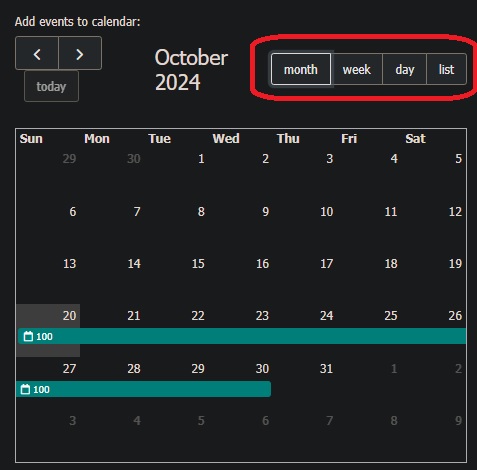
After selecting and entering the details, click the two ‘Save’ buttons seen on the page. Dates chosen will have a color as an indication of the preferred dates. You may navigate to the ‘Week’ or ‘Day’ view if desired. The ‘List’ view displays the scheduled events/dates as well as the targeted number of positions per day.
Outcome:
The set number of workers will only have access to tasks during the set time frame (October 20 to October 31). Outside these dates, no tasks will be available.
Scenario 2 – Working on Certain Days of the Week (Recurring Events):
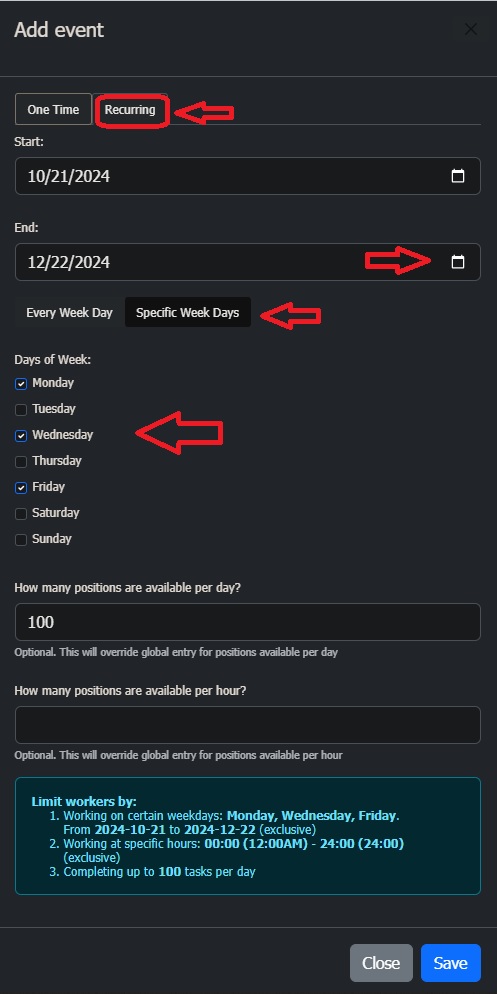
You are running a data entry campaign that requires workers to perform tasks only on Mondays, Wednesdays, and Fridays. This is an ongoing project that will continue for the next two months, with tasks available on these specific days each week.
How to Configure:
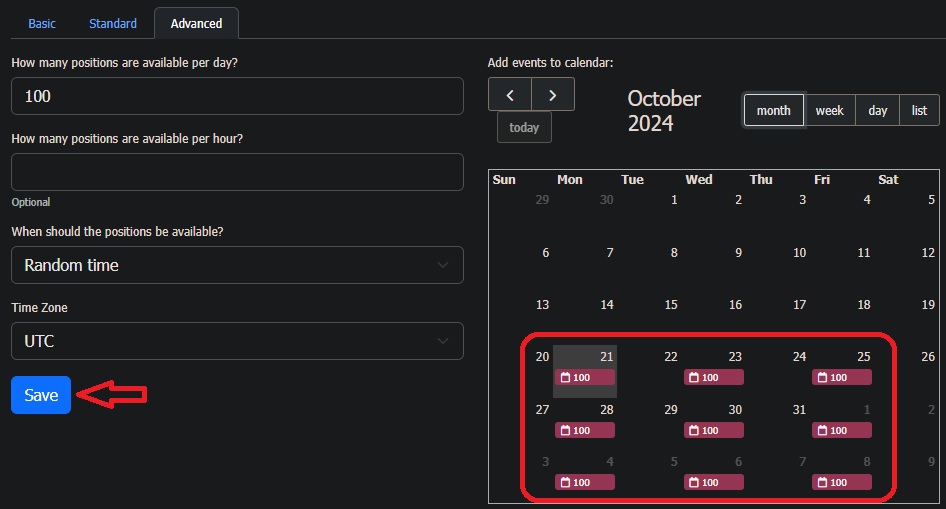
Pick the start date, for instance, October 21. The pop-up box will appear. To schedule a recurring event, simply click on the ‘Recurring’ tab at the top (see picture below). Set the ‘End’ date manually or by using the calendar icon. Navigate to the ‘Specific Week Days’ tab to display the days of the week. Then tick the target days. Next, click the ‘Save’ button.
Chosen dates are highlighted with a color to show which ones were selected. Lastly, click the ‘Save’ button.
What to expect:
With this setup, tasks will become available for a specific 3-day period in a week (Mondays, Wednesdays, and Fridays), until December (two months). Targeted number of workers (100 workers) are expected to complete the tasks only on these specific days.
Scenario 3 – Working at Specific Times (Use the Week or Day Tab to Pick Hours):
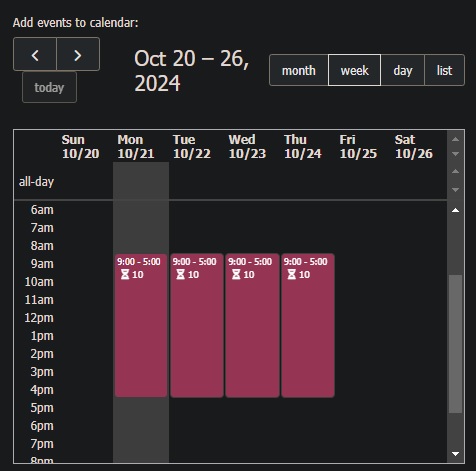
Presuming that you need specific hours on when your tasks should be available. And you would like to limit the number of workers per hour. Let us say you want the tasks available only during business hours from 9:00 AM to 5:00 PM, Monday through Friday and 10 workers per hour.
How to Configure:
Since the target days are Monday through Friday, click the week tab to enter the active hours. Again, a pop-up box will appear. Choose ‘Recurring’ tab then enter the desired ‘End (exclusive) date’ as well as the ‘End time’. After that, ‘Save’. Calendar will show the selected day and time in red color.
By leveraging these customizable options, you can streamline task management, enhance productivity, and ultimately achieve your project goals with greater ease. Choose the setting that best suits your needs and start maximizing your efficiency today! 😉
We got your back! If you have any concerns regarding this feature, you can easily reach us out here.
You may also be interested in the following:
Introducing the Campaign Builder Tool
Creating an Effective Qualification Test on Microworkers: A Guide for Employers
Auto Recharge Feature




No Comments so far.
Your Reply