Welcome back to the first coding part of our tutorial. Here, we will show you how to create a simple Website capable of accepting user comments. We have chosen to program this from scratch so that one may not necessarily need to have any insights of an existing System like WordPress for example.
You can try out the completely finished Comment Moderation System at commentmoderation.demo.microwrokers.com. You can also download the end result of this part at commentmoderation.demo.microwrokers.com/Downloads/Step1.zip. We recommend that you download this Zip-File first if you want to follow along as we will only mention the most important steps in this tutorial.
Before we begin with the actual Website, we will have to create a database table where our comments will be stored. Our table named “comment” consists of the following columns:
- Id: This is an unique identifier used for distinguishing the single comments
- userName: Holds the username of the comment author
- comment: The actual comment given by the user
- created: A timestamp stating when the post was created
- status: A status represented by an integer. We will use 0 to mark newly created comments, 1 for comments which are currently being reviewed in a campaign, 2 for comments which have been approved and finally 3 for comments which have been declined.
Now we set up our project with the following folder structure:
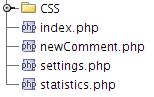
The CSS Folder will hold the styling information. For simplicity we have chosen a smaller version of our current blog design, feel free to customize according to your needs. The settings.php file will be used to hold all variable settings we will need throughout the project. The index.php file will display a list of all approved comments and some statistics regarding the current moderation progress. The newComment.php file will be used to submit new comments on the Website. And finally the statistics.php file is used to gather some statistics. As we display the statistics on the newComment as well as on the index page we hold this code snipplet in a central location.
Settings.php:
This file is more or less self-explanatory. For this part we only need the settings to access the database (lines 3 to 13) and we additionally assign a variable holding the root path of our application for convenience.
Index.php:
Here we include our settings.php file (line 3) and open a connection to the database (lines 6 to 12). If this has succeeded we include the statistics.php which will be explained in more detail later. Then we fetch all the approved comments from the database and sort them by their creation date (lines 18-20). At this point we have already gathered all the information needed and begin with the HTML code section which will be responsible for creating the visual representation of the site. Most of this code is used for styling purposes. The interesting part starts at line 46 where we iterate over all comments we have fetched from the database in a while loop to output every individual comment (lines 46 to 75). As the username and the comment is inputted by the user be sure to always escape these values for security reasons. For this we use the function “htmlspecialchars” provided by PHP. In the lines 88 to 92 we state some statistics about the current moderation progress. The rest of the file is again simply for styling purposes.
Statistics.php:
As this file is included after the connection to the database has been established, we can directly query the database. As seen in the index.php file we want to state the following statistics on our page:
- Number of total comments (all states)
- Number of new comments (status: 0)
- Number of comments which are being currently reviewed in a campaign (status: 1)
- Number of approved comments (status: 2)
- Number of declined comments (status: 3)
We achieve this by counting all the comments in the comments table according to their current state (lines 3 to 22).
NewComment.php:
Again we start by including the settings.php file and open a database connection just as seen in the index.php file. Then we check if this page has received a comment by checking if the “$_POST” array is set (line 16). In case it is, we check if the user has inputted both required fields – the username and a comment (lines 18 to 31). If everything is as expected, we insert the new comment into our database (lines 36 to 45). Be sure to escape the user input before passing it to the database for security reasons. You can use the PHP function “escapestring” of the database object. The last step is redirecting the user to the index.php page.
In case the user has not yet supplied a comment or has missed to fill out one of the required fields, we will display a page containing a form to enable the user to create a new comment. Again most of the HTML code stated here is for styling purposes. The actual form is outputted in the lines 77 to 93.
So far so good. We are now able to display and insert comments on our page and the good news is that this was the most work-intensive part. In our next post we will show you how can group all the newly posted comments into a Campaign for further moderation.
5 Comments
i am account payment transfer not apporoved i am help information please
excelent
Excellent work
This one is very much informative. Learn so many things.
I am doing the microwork job but further work I have to register the mobile number. I entered my mobile number that one step is over but second step is verifying the mobile number through verification code but I am not getting the verification code so help me how to get verification code
Your Reply